
Grafana is an open-source analytics and monitoring platform designed to visualize time-series data through interactive and customizable dashboards. It connects to various data sources such as databases, cloud services, and monitoring systems, transforming raw data into meaningful insights using graphs, charts, and alerts.
This article is a comprehensive guide to understanding for datacenters and confirming its cross-platform capabilities. We’ll also walk you through the detailed steps for Grafana download, install and set up procedures, and the initial Grafana configuration options across Linux, Windows, and macOS systems.
What is Grafana Used for?
Organizations use Grafana to monitor infrastructure performance, health application, and real-time system metrics. Whether tracking server uptime, network activity, or resource utilization, Grafana plays a critical role in observability and decision-making. Its applications range from CPU CPU and memory of a single server to orchestrating comprehensive observability stacks for global enterprises.
What is the Relevance of Grafana to Datacenters and Servers?
Grafana is highly relevant to modern datacenters and server environments because it acts as a centralized layer for operational data. In large-scale infrastructures, administrators must monitor CPU usage, memory consumption, disk I/O, and network traffic across multiple machines. Grafana simplifies this complexity by consolidating metrics into a unified dashboard.
In datacenters, Grafana is commonly integrated with monitoring tools such as Prometheus, InfluxDB, or Elasticsearch. This integration allows real-time tracking of system performance and enables proactive issue detection. For example, administrators can configure alerts to trigger when server load exceeds a defined threshold, helping to prevent downtime.
For server hosting providers, Grafana enhances service reliability by providing transparency into infrastructure health. It supports capacity planning, anomaly detection, and performance optimization. In addition, Grafana dashboards can be shared with stakeholders, making it easier to communicate technical insights to non-technical audiences.
Can Grafana be Used on Linux Distrubutions, Windows and macOS Systems?
Grafana is a cross-platform application that supports Linux distributions, Windows, and macOS systems. This cross-platform support ensures that users can perform Grafana setup and monitoring regardless of their operating system.
- Linux Distributions: Grafana is widely used on Linux systems such as Ubuntu, CentOS, and Debian due to its stability and compatibility with server environments.
- Windows: Grafana provides native support for Windows, making it accessible for users who prefer a graphical operating system.
- macOS: Developers and administrators using macOS can install Grafana locally for testing and development purposes.
How to Download Grafana on Linux Distributions, Windows and macOS Systems
The following steps will ensure a proper Grafana download process tailored to each operating system. Some of the steps will involve commands that you type on a terminal.
For Linux Distributions:
- 1) Press Ctrl+Alt+T simultaneously on your keyboard to open the terminal
- 2) Update the package list:
- sudo apt update
- 3) Add Grafana repository:
- sudo apt install -y software-properties-commonsudo apt install -y software-properties-common
- sudo add-apt-repository “deb https://packages.grafana.com/oss/deb stable main”
- 4) Download the Grafana package:
- sudo apt update
- sudo apt install Grafana
For Windows:
- 1) Go to the official Grafana download website.
- 2) Select the Windows version.
- 3) Download and save the .msi installer file.
For macOS:
- 1) Go to the official Grafana download website.
- 2) Selexct the macOS version.
- 3) Download and save the .dmg installer file.
- 4) An alternative and efficient installation method is via Homebrew:
- Install Homebrew by using the following command:
- /bin/bash -c “$(curl -fsSL https://raw.githubusercontent.com/Homebrew/install/HEAD/install.sh)”
- 5) Update Homebrew, then download and install the Grafana package:
- brew update
- brew install grafana
How to Install Grafana on Linux Distributions, Windows and macOS Sytems
The following steps will compelte the install Grafan process across supported platforms. Some of the steps will involve commands that you enter on a terminal.
For Linux Distributions:
- 1) Press Ctrl+Alt+T simultaneously on your keyboard to open the terminal.
- 2) For Debian/Ubuntu, use the following command:
- sudo dpkg -i grafana-enterprise.deb
- sudo apt-get install -f
- 3) For RedHat/CentOS, use the following command:
- sudo yum install grafana-enterprise.rpm
- 4) Start and enable Grafana:
- sudo systemctl start grafana-server
- sudo systemctl enable grafana-server
For Windows:
- Locate the .msi installer file that you previously downloaded to your computer.
- Doble-click to launch the installer.
- Follow the setup wizard instructions.
- Click “Install”. Wait for the installation to be completed.
- Start Grafana via Services:
- net start grafana
For macOS:
- Open the .dmg installer file that you previously saved in your computer.
- Drag Grafana to the Applications folder.
- Launch Grafana from Applications.
- To install Grafana via Homebrew, use the following commands:
- brew install Grafana
- Start Grafana:
- brew services start grafana
How to Set Up Grafana on Linux Distributions, Windows and macOS Systems
By the time you reach the last step in the setup procedures for each of the operating systems, the Grafana setup and initial Grafana configuration are comlete, which will allow users to begin the monitoring process.
For Linux Distributions:
- Open a web browser and go to: http://localhost:3000
- Log in using the default credentials:
- Username: admin
- Password: admin
- Change the default password.
- Add a data source (e.g., Prometheus, MySQL, etc.,)
- Configure the dashboards based on metrics.
For Windows:
- Launch Grafana from the Start menu.
- Open a web browser and go to: http://localhost:3000
- Log in with the default credentials and update the password.
- Add and configure data sources.
- Create dashboards.
For macOS:
- Check if the Grafana service is running with this command:
- brew services start grafana
- Access Grafana via a web browser and go to: http://localhost:3000
- Log in with the default credentials and change the password.
- Add and configure data sources.
- Build dashboards.
How to Use the Grafana Dashboard
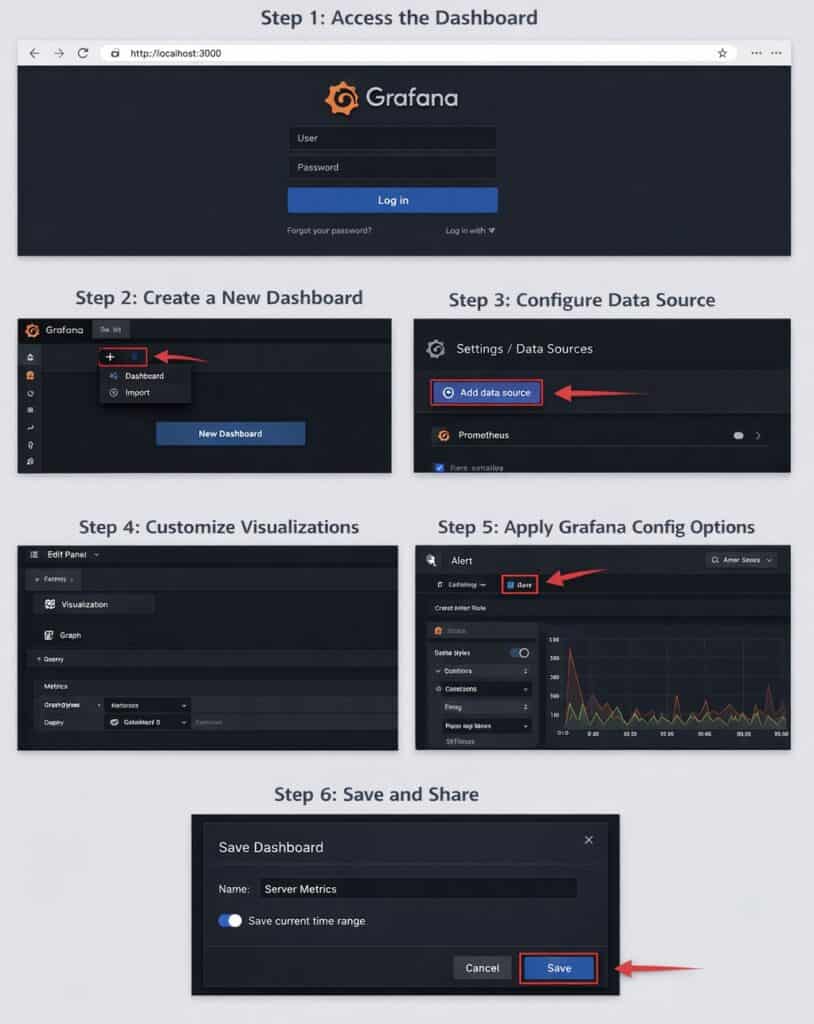
- 1) Access the Dashboard:
- Open Grafana in a web browser.
- Log in with your credentials.
- 2) Create a New Dashboard:
- Click the “+ Create” icon.
- Select “Dashboard”.
- Select “Add new panel”.
- 3) Add Panels:
- Choose a connected data source.
- Define and write using PromQL, SQL, or other supported languages to retrieve metrics.
- Select the visualization type (graph, gauge, table).
- 4) Customize Visualizations and Layouts:
- Select visualization types such as graphs, tables, or heatmaps.
- Adjust axes, labels, and thresholds.
- Drag panels to rearrange.
- Resize for better visibility.
- Group related metrics.
- 5) Apply Grafana Config Options and Set Alerts:
- Modify panel settings.
- Set refresh intervals.
- To set alert rules:
- Go to Alerting -> Alert rules.
- Define conditions (e.g., CPU > 80%).
- Choose notification channels (email, Slack, webhook).
- 6) Save and Share:
- Click on Save dashboard.
- Share via link or export options.
Maximinzing Monitoring Efficiency with Grafana
Grafana is a versatile and powerful tool for monitoring infrastructure and visualizing data. Whether you’re using Linux, Windows, or macOS, the steps to install Grafana, complete Grafana setup, and explore Grafana configuration are straightforwardand well-supported.
By leveraging Grafana config options, you can tailor dashboards to your needs, set alerts for critical metrics, and ensure your systems run smoothly. With its open-source nature and active community, Grafana continues to evolve as a leading solution in observability and analytics.
Enhance Your Grafana Monitoring with ServerHub’s Cloud Hosting Solutions
ServerHub’s cloud hosting solutions are built to support modern monitoring platforms like Grafana by delivering high-performance VPS and IaaS environments with SSD storage, RAID-10 architecture, and high-speed network connectivity. With globally distributed data centers and rapid deployment capabilities, businesses can quickly launch scalable infrastructure that integrates seamlessly with Grafana dashboards for real-time performance visualization and alerting. Contact us now to leverage ServerHub’s powerful cloud hosting solutions and elevate your Grafana-based monitoring environment.
References:
- Getting Started with Grafana
- Grafana: The Comprehensive Monitoring Platform
- Grafana Technical Documentation
- How to Configure Grafana Settings
- Build Grafana Dashboards
- Configure Grafana