In this artcle we are going to show you how to reset the IPMI BMC firmare on your physical Supermicro Server.
Step 1 – Download IPMICFG from Supermicro website (1 st option)
https://www.supermicro.com/SwDownload/SwSelect_Free.aspx?cat=IPMI
(It will ask to accept user agreement, accept it and it will start download)
Step 2 – Grab a USB and insert it into your computer.
Step 3 – Start up Rufus, it’s a free open source software, and format USB as a FreeDOS USB https://rufus.ie/
Step 4 – Go to file explorer and find downloaded IPMICFG file. Once found, extract file to the USB that was just formatted. Once done remove USB key.
Step 5 – Take USB key that was just formatted and insert it into the target server. Then reboot server into that USB
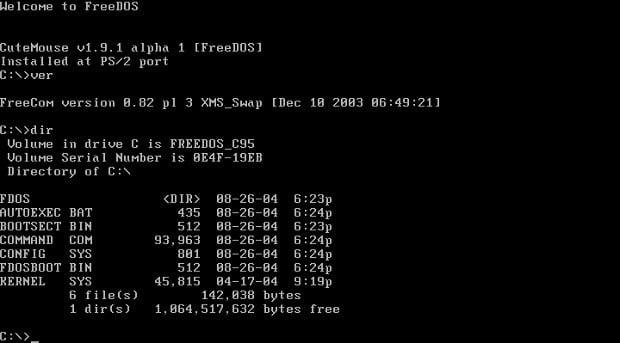
Step 6 – Once booted into the USB it should take you to a screen that says DOS at the top.
You should see the C:\ file icon.
We are going to need to change the directory to the IPMI tool. We do that by typing in the command “CD IPMICFG”
Step 7 – Once we are in the IPMI tool file we are going to start the tool.
We do that by typing “IPMICFG.EXE” that will start the tool
Step 8 – Now that we are in the tool, we are going to reset the IPMI BMC to factory settings.
We do this by typing “IPMICFG -FDE”
This will reset the chip to factory settings. It takes about a minute or two to do this so make sure to wait before moving on to Step 9.
Note: Resetting BMC will result in IPMI login info defaulting to ADMIN
Step 9 – Once the BMC is done rebooting, we are going to turn off DHCP.
We are going to type in “IPMICFG -DHCP OFF”
Step 10 – Next we are going to set the static IP for the server.
To do this we are going to type “IPMICFG -M xxx.xxx.xxx.xxx”
Make sure your IP is entered in this specific format.
Step 11 -Now we are going to set the server Subnet. Type in “IPMICFG -K xxx.xxx.xxx.xxx”
Again, make sure you type in the IP in the correct format
Step 12 – Finally we are going to set the gateway IP for the server.
Let’s type in “IPMICFG -G xxx.xxx.xxx.xxx”
Step 13 – Now all that’s left is to set the password for the IPMI GUI interface.
Now we will type in “ipmicfg -user setpwd 2 (Desired password)”
Note, you do not need any parentheses to enter in a password.
Step 14 – Now all we need to do is restart the server and BOOM!
Server IPMI should be setup form factory settings.
It is good practice to load up your BIOS to make sure IPMI IP settings are reflecting correctly.
And there you have it! You should now have been able to successfully reset your IPMI back to default and configure it with the needed IP address for your server.
How to reset IPMI BMC to factory default using IPMICFG
What’s your Reaction?
+1
11
+1
1
+1
2
+1
2
+1
1
+1
+1
6