
According to the Apache software foundation that was established in 1999 based on individual donations and corporate sponsors, Apache is open-source software that runs on 67% of the world’s web servers.
Able to meet the needs of many with reliable security and incredible speed, Apache became the most extensively used web server around the world.
Additionally, Apache is used by the majority of WordPress hosting providers to freely turn computers into HTTP servers so people can request them as websites over the internet.
Also, it can provide other impressive features that include but are not limited to:
- Vigorous media support
- Comprehensive integration with popular software
- Dynamically loadable modules
Side note: a web server is a software that receives your web page request, runs security checks on your HTTP request, and delivers you the web page as quickly as possible.
That speed depends on the modules your server has to run based on the page you requested.
In this article, you’ll learn
- How to set up Apache
- Basic Apache configuration
Apache installation prerequisites
- A system running Ubuntu
- A user account with sudo privileges
- Basic Linux command line knowledge
- An internet connection
Required tools to install Apache
- A command-line service like Ubuntu’s default terminal (keyboard shortcut CTRL + ALT + T)
- The APT package manager that comes by default with Ubuntu
- A firewall like the UFW (Uncomplicated Firewall, which we’ll talk about later)
Now that you’ve got everything ready, let’s jump right into it!
Installing Apache
Updating your local software package database to the latest version is advised before installing additional software.
Not only it will shorten the future updates’ time, but will also protect your outdated software against any manipulations.
To update your local package index on Ubuntu, open your terminal and type in the following:
- sudo apt update
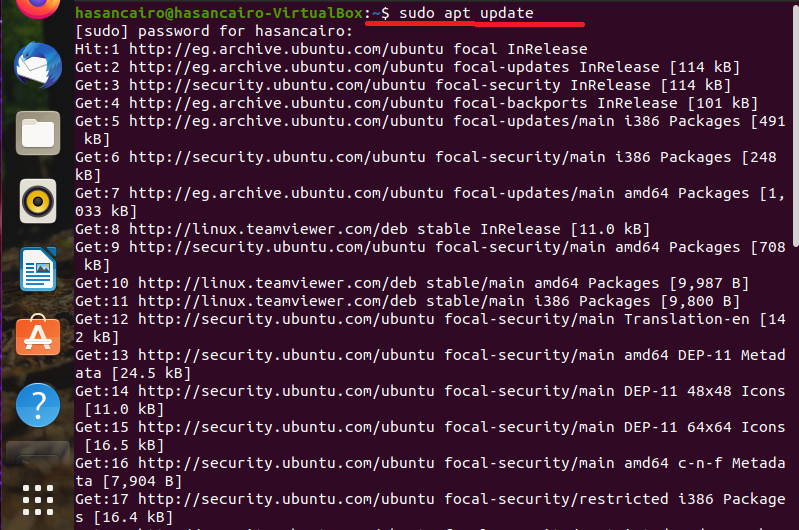
Give the package manager some time to finish updating.
You’ll have no problem installing Apache after the update since it’s already available as a part of Ubuntu’s default software depository, and can be installed using current package management tools.
This time, type in your terminal:
- sudo apt install apache2
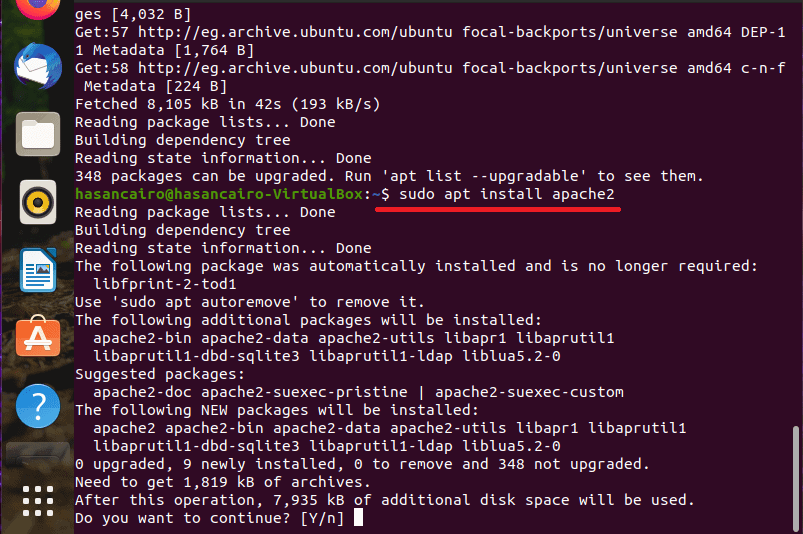
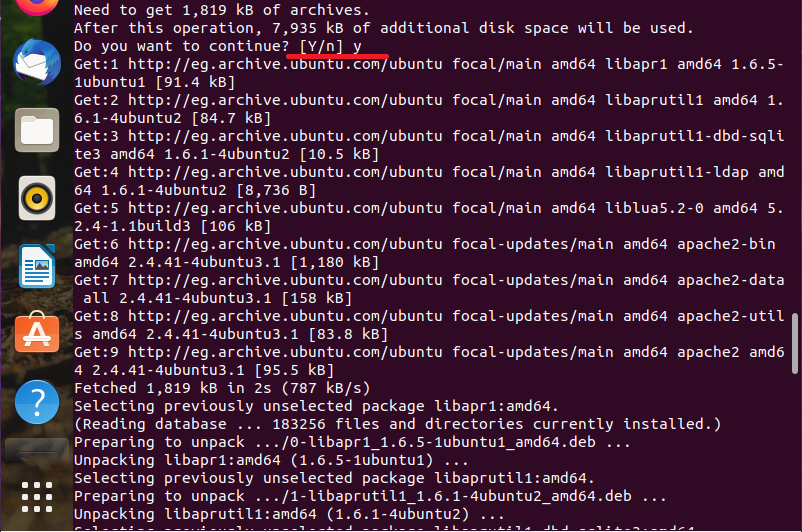
As seen in the screenshot above, the system will ask for your confirmation.
Just allow it to conclude the Apache installation.
Verify Apache installation
Carried these simple steps but still unsure whether it worked? We got you covered!
Simply, open a web browser and type localhost in the address bar.
Once you receive (and you will) a page titled “Apache2 Ubuntu Default Page” like the one below:

It means that now Apache has been successfully installed on your server!
Another option to verify is to open your web browser and type in: http://local.server.IP “where IP is replaced with your server’s IP address.
Worried about how to figure out your server’s IP address?
Use freeware online tools like whatismyipaddress.com/ or type in your terminal: hostname -I | awk ‘{print $1}’
Seriously, localhost should do just fine.
Adjust your firewall
You should have a UFW firewall ready, given that you followed the above instructions. Therefore, the only steps you need to take are:
Take a look at the available UFW’s app profiles by typing: sudo ufw app list using your terminal.
You’ll receive the following profiles list:
Apache: a profile that opens port 80
Apache secure: a profile that opens port 443
Apache full: a profile that opens both port 80 and port 44
We recommend enabling the port that will allow your configured traffic so far, which’s port 80.
To do that, type in the following command using your terminal:
- sudo ufw allow ‘Apache’

Afterward, you can verify the change by typing:
- sudo ufw status
The Apache Service process and controls
Having control over your service is a must, especially in our case, where you’ll find yourself restarting and/or reloading Apache often.
With our up and running server, here are some basic options you can take advantage of when it comes to controlling, using the systemctl command.
To restart the service:
- sudo systemctl restart apache2
To stop your server:
- sudo systemctl stop apache2
To start after stopping:
- sudo systemctl start apache2
Disabling Apache automatic start:
- sudo systemctl disable apache2
Re-enabling automatic startup:
- sudo systemctl enable apache2
Reloading Apache to make simple configuration changes:
- sudo systemctl reload apache2
Your system might ask to reload Apache at any given command, which’s completely fine.
Creating your website
You can use Apache virtual hosts to host more than one domain from a single server.
We will set up a domain called serverhubtest, but feel free to replace it with your own domain name.
Apache on Ubuntu 20.04 has one server block enabled, which’s configured to serve documents from the /var/www/html directory.
Indeed, this works well for a single site, but it can become unmanageable if you’re hosting multiple sites.
Let’s create a directory structure within /var/www for a serverhubtest site, instead of modifying /var/www/html
Create the directory for serverhubtest by inputting:
- sudo mkdir /var/www/serverhubtest
Then, assign ownership of the directory:
- sudo chown -R $USER:$USER /var/www/serverhubtest
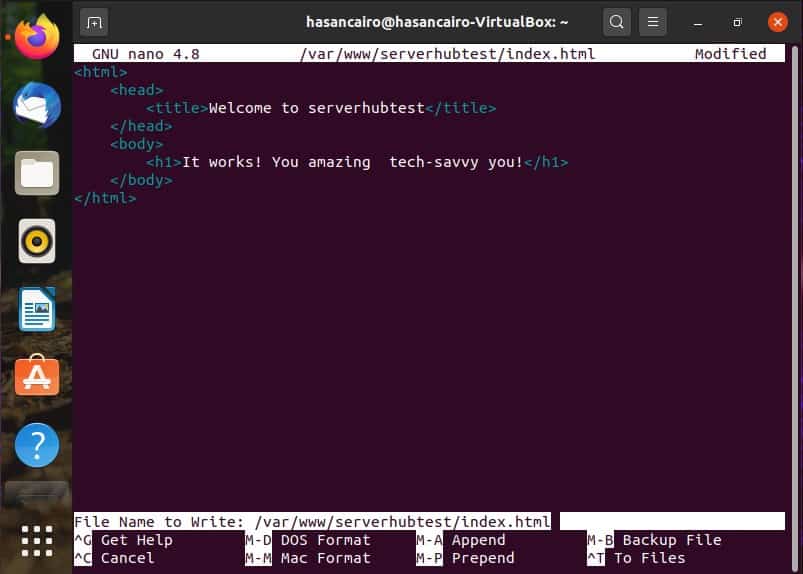
Next, create a sample index.html page using the nano editor:
- sudo nano /var/www/serverhubtest/index.html
Afterward, add the following sample HTML:
<html>
    <head>
        <title>Welcome to serverhubtest</title>
    </head>
    <body>
        <h1>It works! You amazing  tech-savvy you!</h1>
    </body>
</html>
Save with CTRL + X then Y, and close the file when all is finished.
Now, you’ve to create a virtual host file with the correct directives, instead of modifying the default configuration file located at /etc/apache2/sites-available/000-default.conf
To do that, use your terminal to input:
- sudo nano /etc/apache2/sites-available/serverhubtest.conf
Paste in the following configuration block that’s similar to the default, but only updated for the new directory and domain name:
<VirtualHost *:80>ServerAdmin webmaster@localhostServerNameserverhubtestServerAliaswww.serverhubtestDocumentRoot /var/www/serverhubtestErrorLog ${APACHE_LOG_DIR}/error.logCustomLog ${APACHE_LOG_DIR}/access.log combined</VirtualHost>
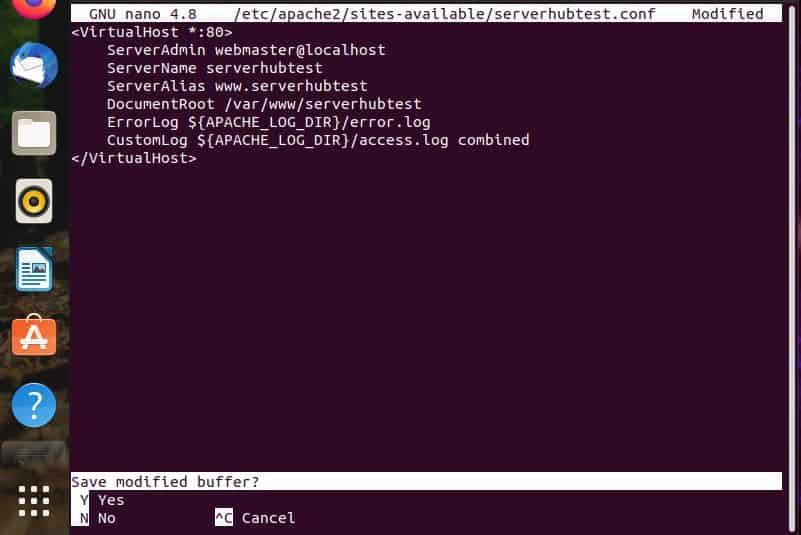
Save using Ctrl + x and close the file.
It’s time to enable the file with the a2ensite tool:
- sudo a2ensite serverhubtest.conf
Disable the default site in 000-default.conf:
- sudo a2dissite 000-default.conf
Finally, test for configuration errors using:
- sudo apache2ctl configtest
You should receive the following output:
OutputSyntax OK
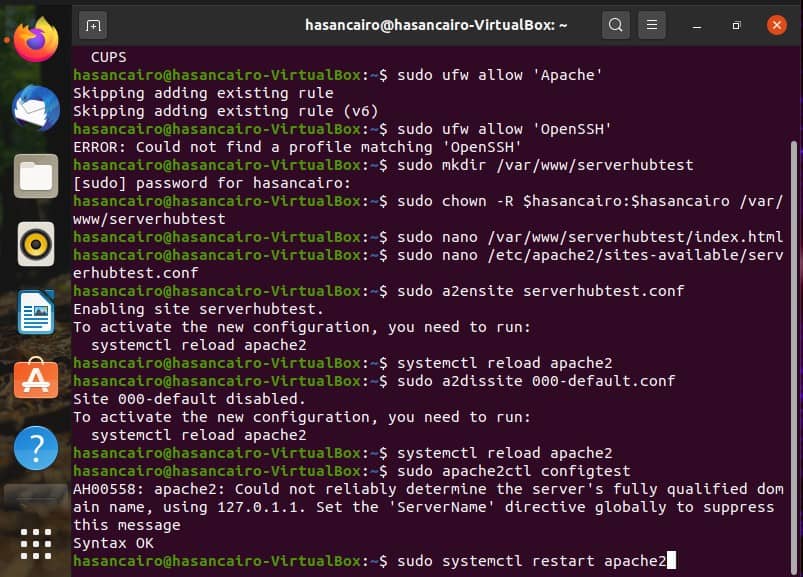
Last note: restart Apache to implement your changes:
- sudo systemctl restart apache2
Apache should now be serving your domain name.
You can test this by visiting http://serverhubtest, or writing localhost in your browser address bar.
When you do see something like this:
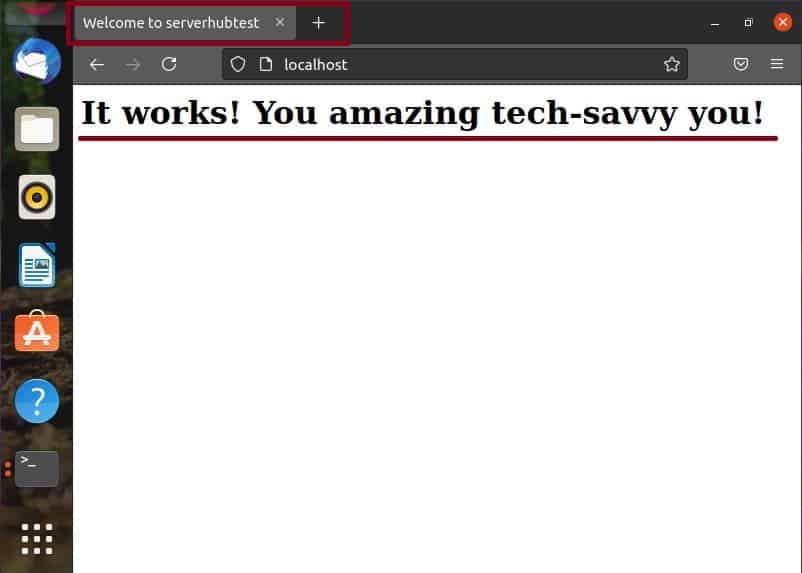
It means that you’ve done it, you amazing tech-savvy you!
Important Apache directories
Congrats! You’ve definitely come a long way with managing the Apache service. Still, you need to take extra minutes to get used to a few important directories and files.
Configuration Files
Log files for generated errors can be found at /var/log/apache2/error.log
Access logs for interactions with clients are in the file /var/log/apache2/access.log
The website content is stored in the /var/www/html/ directory
Apache does function through configuration files, which are located in /etc/apache2/
The main Apache configuration file that controls everything is located at /etc/apache2/apache2.conf
The file that holds ready-to-serve-client websites: /etc/apache2/sites-enabled
The storage for Apache virtual host files: /etc/apache2/sites-available
You can customize the ports Apache monitors using the file: /etc/apache2/ports.conf
Feel free to take a deeper look at all other configurations and directories visiting the Ubuntu server guide.
ServerHub and creating your website
You’re probably wondering: How can I create my complete website in the easiest way?
That’s where we’ve got you covered.
ServerHub provides top-of-the-line dedicated servers at affordable prices using only enterprise-grade hardware.
We constantly add new integrations and features to our products, so no matter what your website is for, ServerHub is here for you.
If you’re thinking of creating your own website, don’t hesitate to reach out to our support team for information at: [email protected]
Although this article focuses mostly on Ubuntu Linux and how to install Apache, ServerHub can be used with any operating system.
Benefits of using ServerHub
Here’s a glimpse of what you’ll get when you deploy your server using ServerHub:
1. Multiple locations
Our Platform spans 9 locations around the globe that it seems like your servers are right next to each other.
We have multiple single 40GB interface connectivities within our data center to bring you the fastest connections available
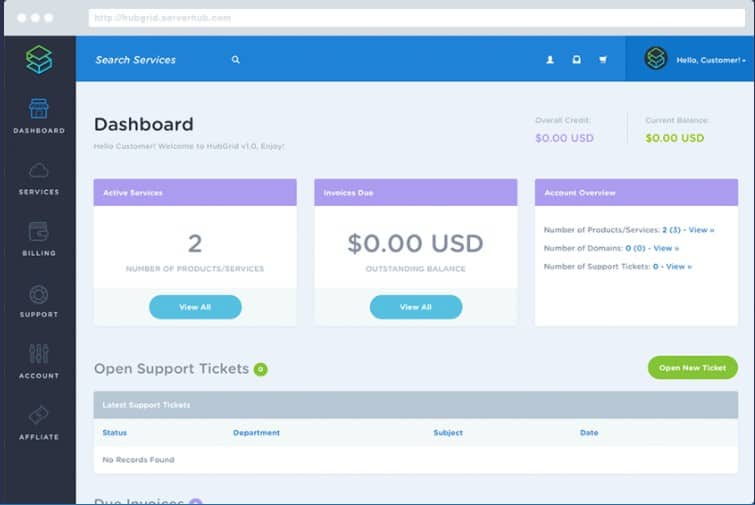
2. A Simplified, Beautiful Interface
Elegance meets Simplicity. True brilliance and execution can only be expressed in one word: HubGrid.
Designed from the ground up with beauty, finesse, and pixel-perfect presentation. No other panel can compare.
3. 100% Uptime, 24/7 support, and leading resolution times!
We deliver fast, reliable, and knowledgeable support with every service we provide.
We focus on meaningful resolution times so you can get the answers you want when you need them. Because what is a great enterprise network and infrastructure without a solid team to support it?
4. Consider a Custom Quote
Need a Custom Quote? Our sales team at [email protected] can Help!
Get a custom solution backed by 24/7/365 support, and built on a solid redundant Tier 1 Network.
Over to you!
Naturally, you face these obstacles at first when you’re getting exposed to the web hosting and cloud deployment world.
Still, as you can see, there’re plenty of other options that you can choose from to run your own server.
Now it’s time for you to start running your own website.
Take advantage of ServerHub’s unlimited personalization, great customer support, and unprecedented prices starting from $5 a month!
What are you waiting for?
If you need help with your amazing upcoming website or have questions or suggestions, please reach our support team at: [email protected]
Conclusion
I know this has been quite the tutorial, but you made it to the moment of truth!
After cheering up with the fact that you now have your web server installed, you still got many ways left to go!
If you’re thinking of something that’s right there at your fingertip, ServerHub can spare you all the technical details -plus many more-.
Instantly deploy your own server and website in a matter of no time!
What content are you planning to have? What are the best practices you’ll follow to enhance both your site and visitors’ experience?
Tell us in the comments below how will-you put your newly gained Apache configuration skills into good use!
This tutorial is a part of the LAMP stack guide series.
Check out the rest of the series:
How to install the latest Ubuntu Linux? Beginner’s guide
How to Install PHP on Ubuntu 20.04? Step-by-step Easy Guide
How To Install MySQL On Ubuntu? The Proven 2021 Guide
Read more
What Are The Types Of Operating Systems (OS)
What’s The Difference Between Remote VPN & Site-To-Site VPN